【Objective-C】iOSアプリ iPhone iPad 縦横レイアウト対応
iPhoneの3.5inch, 4inch, iPadそれぞれ縦横対応する方法です。
いろいろなやり方があると思いますが、ここで紹介するやり方は、縦横それぞれレイアウトが違う場合に有効です。
もちろん、Auto Layoutだけで大丈夫ならここでの方法は使わない方がいいと思います。
(環境:xcode5.1, iOS 7.0)
■全体の流れ
- iPhone3.5inch、iPhone4inch、iPadそれぞれ縦・横のxibファイルを用意する
- 各xibファイルにUIViewを配置する
- UIViewControllerで作成したxibファイルからUIViewを呼び出して表示させる
1. iPhone3.5inch、iPhone4inch、iPadそれぞれ縦・横のxibファイルを用意する
例えば、iPhonePortrait.xib, iPhoneLandscape.xib, iPadPortrait.xib, iPadLandscape.xibというファイルを用意します。
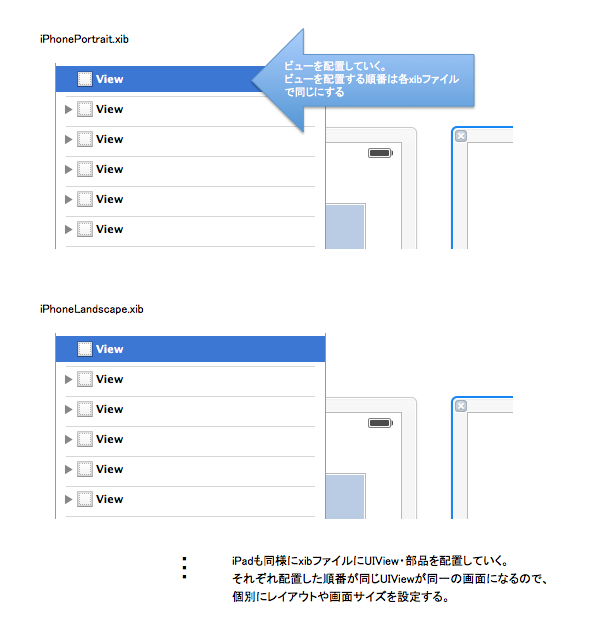
2. 各xibファイルにUIViewを配置する
用意した各xibファイルにUIViewを配置していきます。

3. UIViewControllerで作成したxibファイルからUIViewを呼び出して表示させる
xibファイルからUIViewオブジェクトを呼び出します。以下のようなメソッドを用意してあげて、
- (NSArray *)viewLayoutFromOrientation {
    UIInterfaceOrientation orientation = [[UIApplication sharedApplication] statusBarOrientation];
    NSArray *topLevelObjects;
    //Landscape(横レイアウトの場合)
    if(UIInterfaceOrientationIsLandscape(orientation)) {
        if (UI_USER_INTERFACE_IDIOM() == UIUserInterfaceIdiomPhone) {
            // iPhone4inchの場合
            if ([[UIScreen mainScreen] bounds].size.height == 568) {
                topLevelObjects = [[NSBundle mainBundle] loadNibNamed:@"iPhoneLandscape" owner:self options:nil];
            // iPhone3.5inchの場合
            } else {
                topLevelObjects = [[NSBundle mainBundle] loadNibNamed:@"iPhone3_5Landscape" owner:self options:nil];
            }
        // iPadの場合
        } else {
            topLevelObjects = [[NSBundle mainBundle] loadNibNamed:@"iPadLandscape" owner:self options:nil];
        }
    //Portrait(縦レイアウトの場合)
    } else {
        if (UI_USER_INTERFACE_IDIOM() == UIUserInterfaceIdiomPhone) {
            if ([[UIScreen mainScreen] bounds].size.height == 568) {
                topLevelObjects = [[NSBundle mainBundle] loadNibNamed:@"iPhonePortrait" owner:self options:nil];
            } else {
                topLevelObjects = [[NSBundle mainBundle] loadNibNamed:@"iPhone3_5Portrait" owner:self options:nil];
            }
        } else {
            topLevelObjects = [[NSBundle mainBundle] loadNibNamed:@"iPadPortrait" owner:self options:nil];
        }
    }
    return topLevelObjects;
}
ビューの設定をするときにこのメソッドを呼びます。
// xibファイルの上から何番目に配置したUIViewか。
// 0 であれば一番最初のUIViewを示す。(2. の図の選択されて青くなっているUIView)
int viewIndex = 0;

// UIViewをxibから呼び出して設定
UIView* sampleView = [[self viewLayoutFromOrientation] objectAtIndex:viewIndex];
[self.view addSubview:sampleView];
※補足
気をつけなければならないことは、画面回転したときに都度xibファイルから呼び出して再設定しないといけないことです。
// これか
- (void)willAnimateRotationToInterfaceOrientation:(UIInterfaceOrientation)toInterfaceOrientation duration:(NSTimeInterval)duration {
    [self setUpViewForOrientation];
}

// これのどちらかで、
// xibファイル読込処理を呼び出して上げると画面回転したときにきれいに縦横レイアウトが切り替わる。
- (void)viewWillLayoutSubviews{
    [self setUpViewForOrientation];
}
以上です。