【Android】DialogFragmentでリスト選択ダイアログ
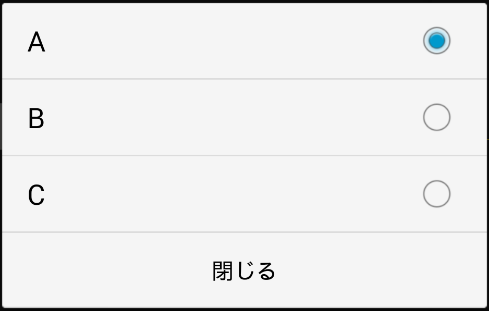
DialogFragmentでシングルチョイスのリストダイアログを表示する方法です。
(確認環境:Android 4.4.2)
下図のようなダイアログを表示します。

public class SampleDialogFragment extends DialogFragment {

	@Override
	public Dialog onCreateDialog(Bundle savedInstanceState) {
		CharSequence[] items = { "A", "B", "C" };

		AlertDialog.Builder builder = new AlertDialog.Builder(getActivity());
		builder.setSingleChoiceItems(items, 0, new DialogInterface.OnClickListener() {
			public void onClick(DialogInterface dialog, int which) {
				// A, B, Cが押されたときの処理
				dialog.dismiss();
			}
		});
		builder.setNegativeButton("閉じる", new DialogInterface.OnClickListener() {

			@Override
			public void onClick(DialogInterface dialog, int which) {
				dialog.dismiss();
			}
		});
		Dialog dialog = builder.create();
		return dialog;
	}
}
以上です。
【Android】AnimationDrawableのイベント検知
AnimationDrawableを使ってImageViewをパラパラアニメにした際に、アニメーションが終わったタイミングを検知する方法です。
(確認環境:Android 4.4.2)
こちらに答えがありました。
Android AnimationDrawable and knowing when animation ends - Stack Overflow
下記のメソッドを用意します。
private void checkIfAnimationDone(AnimationDrawable anim){
    final AnimationDrawable a = aim;
    int timeBetweenChecks = 200; // この値はパラパラアニメの duration と一致させる
    Handler h = new Handler();
    h.postDelayed(new Runnable(){
        public void run(){
            if (a.getCurrent() != a.getFrame(a.getNumberOfFrames() - 1)){
                checkIfAnimationDone(a);
	    } else{
	        // アニメーションが終わったときの処理...
	    }
        }
    }, timeBetweenChecks);
}
使い方は以下のようにします。
ImageView anime = (ImageView) layoutView.findViewById(R.id.hoge_image);
anime.setBackgroundResource(R.drawable.hoge_animation);
AnimationDrawable animeFrame = (AnimationDrawable) anime.getBackground();
animeFrame.start();
checkIfAnimationDone(animeFrame);
上記コード中のhoge_animation.xmlは例えばこのようにします。
<?xml version="1.0" encoding="utf-8"?>
<animation-list xmlns:android="http://schemas.android.com/apk/res/android"
    android:oneshot="true" >
    <item android:drawable="@drawable/hoge_1" android:duration="200" />
    <item android:drawable="@drawable/hoge_2" android:duration="200" />
    <item android:drawable="@drawable/hoge_3" android:duration="200" />
</animation-list>
以上です。
【Android】Fragmentを入れ子にする
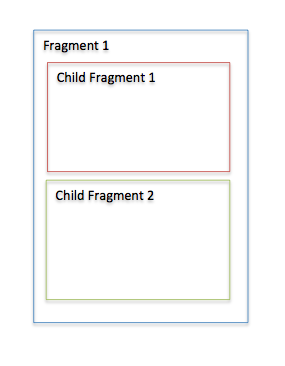
Fragmentを入れ子(ネスト)にするメモです。
(確認環境:Android4.1)
下図のようなイメージを例にとります。

まず親Fragmentである Fragment 1 です。
・Fragment1.java
//..略
import android.support.v4.app.Fragment;
import android.support.v4.app.FragmentTransaction;
//..略

public class Fragment1 extends Fragment {

	@Override
	public View onCreateView(LayoutInflater inflater, ViewGroup container,
			Bundle savedInstanceState) {
		return inflater.inflate(R.layout.fragment_hoge, null);
	}

	@Override
	public void onActivityCreated(Bundle savedInstanceState) {
		super.onActivityCreated(savedInstanceState);
		FragmentTransaction transaction = getChildFragmentManager()
				.beginTransaction();
		Fragment childFragment1 = new ChildFragment1();
		Fragment childFragment2 = new ChildFragment2();
		transaction.add(R.id.child_fragment_1, childFragment1, "child_1");
		transaction.add(R.id.child_fragment_2, childFragment2, "child_2");
		transaction.commit();
	}
}
親フラグメントのレイアウトは下記のようにします。
・fragment_hoge.xml
<?xml version="1.0" encoding="utf-8"?>
<LinearLayout xmlns:android="http://schemas.android.com/apk/res/android"
    android:layout_width="match_parent"
    android:layout_height="match_parent"
    android:orientation="vertical" >

    <FrameLayout
        android:id="@+id/child_fragment_1"
        android:layout_width="match_parent"
        android:layout_height="0dip"
        android:layout_weight="1"/>

    <FrameLayout
        android:id="@+id/child_fragment_2"
        android:layout_width="match_parent"
        android:layout_height="0dip"
        android:layout_weight="1"/>

</LinearLayout>
上記のようにimportをサポートライブラリにするとAndroid1.6から使えるようです。
また、Fragmentをネストする場合は、動的に追加しなければならないようです。
子Fragmentについては省略します。。
以上です。
※参考
Fragmentをネストする際の注意点 - Just for Fun
Android 4.2 APIs | Android Developers
【Android】SlidingMenuライブラリとSurfaceViewを使う際の注意点
SlidingMenuライブラリはものすごい便利〜なライブラリですが、
jfeinstein10/SlidingMenu · GitHub
SurfaceViewと合わせて使う場合は、
setZOrderOnTop(true);
とSurfaceViewで設定しないと画面が崩れます。
以上です。
【Android】PreferenceFragmentをAndroid 2.3で使う
PreferenceFragmentをAndroid2.3で使いたい場合のメモです。
こちらのライブラリーを使います。
kolavar/android-support-v4-preferencefragment · GitHub
実際にクラスで使うときは
import android.preference.PreferenceFragment;
の箇所を
import android.support.v4.preference.PreferenceFragment;
にします。
以上です。
【Android】CheckBoxPreferenceをカスタマイズ
CheckBoxPreferenceの見た目をカスタマイズします。
タイトルやサマリーの文字サイズ・色の変更や、チェックボックスを画像に変える方法を紹介します。
(確認環境:Android4.1)
まずプリファレンスのレイアウトです。
(例:preferences.xml。res/xml/に作成)
<?xml version="1.0" encoding="utf-8"?>
<PreferenceScreen xmlns:android="http://schemas.android.com/apk/res/android"
    xmlns:switchpref="http://schemas.android.com/apk/res-auto"
    android:layout_width="match_parent"
    android:layout_height="match_parent" >

    <PreferenceCategory
        android:key="hogefuga"
        android:title="カテゴリー" >

        <CheckBoxPreference
            android:key="hoge_checkbox"
            android:summary="@string/hoge_string"
            android:title="タイトル"
            android:layout="@layout/custom_checkbox_preference"
            android:widgetLayout="@layout/custom_checkbox" />

    </PreferenceCategory>

</PreferenceScreen>
上記の「custom_checkbox_preference」でカスタムレイアウトを指定し、
「custom_checkbox」でチェックボックスの画像を変更します。
custom_checkbox_preference.xmlです。res/layoutに作成します。
<?xml version="1.0" encoding="utf-8"?>
<LinearLayout xmlns:android="http://schemas.android.com/apk/res/android"
    android:layout_width="match_parent"
    android:layout_height="wrap_content"
    android:gravity="center_vertical"
    android:minHeight="?android:attr/listPreferredItemHeight"
    android:paddingRight="?android:attr/scrollbarSize"
    android:baselineAligned="false" >

    <RelativeLayout
        android:layout_width="0dip"
        android:layout_height="wrap_content"
        android:layout_marginBottom="6dip"
        android:layout_marginLeft="15dip"
        android:layout_marginRight="6dip"
        android:layout_marginTop="6dip"
        android:layout_weight="1" >

        <TextView
            android:id="@+android:id/title"
            android:layout_width="wrap_content"
            android:layout_height="wrap_content"
            android:ellipsize="marquee"
            android:fadingEdge="horizontal"
            android:singleLine="true"
            android:textAppearance="?android:attr/textAppearanceMedium"/>

        <TextView
            android:id="@+android:id/summary"
            android:layout_width="wrap_content"
            android:layout_height="wrap_content"
            android:layout_alignLeft="@android:id/title"
            android:layout_below="@android:id/title"
            android:maxLines="4"
            android:textAppearance="?android:attr/textAppearanceSmall" />
    </RelativeLayout>

    <LinearLayout
        android:id="@+android:id/widget_frame"
        android:layout_width="wrap_content"
        android:layout_height="match_parent"
        android:minWidth="80dip"
        android:gravity="center_vertical"
        android:orientation="vertical" >
    </LinearLayout>

</LinearLayout>
RelativeLayoutのTextViewがありますので、そちらで文字色や文字サイズを変更できます。
続いてcustom_checkbox.xmlです。こちらもres/layoutに作成します。
<?xml version="1.0" encoding="utf-8"?>
<CheckBox xmlns:android="http://schemas.android.com/apk/res/android"
    android:id="@+android:id/checkbox"
    android:layout_width="wrap_content"
    android:layout_height="wrap_content"
    android:button="@drawable/selector_custom_checkbox"
    android:clickable="false"
    android:focusable="false" />
あとはselector_custom_checkbox.xmlを用意して、
画像名を指定してあげるとチェックボックスを画像に変更できます。
例えば下記のようにします。
<?xml version="1.0" encoding="utf-8"?>
<selector xmlns:android="http://schemas.android.com/apk/res/android" >
    <item android:state_checked="true"
        android:drawable="@drawable/btn_on" />
    <item android:state_checked="false"
        android:drawable="@drawable/btn_off" />
    <item android:drawable="@drawable/btn_off" />
</selector>
以上です。
【Android】タスクのクリア
アクティビティーを呼び出すときにフラグを使用して、タスクをクリアするときのメモです。
Android 2.3も対応しています。
intent.addFlags(Intent.FLAG_ACTIVITY_NEW_TASK);
intent.addFlags(IntentCompat.FLAG_ACTIVITY_CLEAR_TASK);
参考はいつものstackoverflowです。
これがないと仕事ができませんよね。。
参考:
http://stackoverflow.com/questions/11098279/alternative-to-intent-flag-activity-clear-task